“贫居闹市无人问,富在深山有远亲。”
正文
源码:\sources\Android-25
PriorityQueue通过名字也可以看的出来,是优先队列,PriorityBlockingQueue是优先阻塞队列,这两个类其实方法都差不多,只不过PriorityBlockingQueue操作的时候会加锁ReentrantLock,PriorityQueue操作的时候是没有加锁的,代码也不多,简单看一下,主要以PriorityQueue中的方法为主,会有部分PriorityBlockingQueue类的方法先看一个构造方法
PriorityQueue
1
2
3
4
5
6
7
8
9
10
11
12
13
14
15
16
17
18
19
20
21
    /**
     * Creates a {@code PriorityQueue} with the specified initial capacity
     * that orders its elements according to the specified comparator.
     *
     * @param  initialCapacity the initial capacity for this priority queue
     * @param  comparator the comparator that will be used to order this
     *         priority queue.  If {@code null}, the {@linkplain Comparable
     *         natural ordering} of the elements will be used.
     * @throws IllegalArgumentException if {@code initialCapacity} is
     *         less than 1
     */
    public PriorityQueue(int initialCapacity,
                         Comparator<? super E> comparator) {
        // Note: This restriction of at least one is not actually needed,
        // but continues for 1.5 compatibility
        if (initialCapacity < 1)
            throw new IllegalArgumentException();
        this.queue = new Object[initialCapacity];//初始化空间
		//比较器,可以为空,如果为空,queue中的元素要实现Comparable接口
        this.comparator = comparator;
    }
构造方法比较多,这里只;列出了其中的一个,这个没啥可说的,下面再看初始化集合的方法initElementsFromCollection
initElementsFromCollection
1
2
3
4
5
6
7
8
9
10
11
12
13
14
15
	// 从集合c中初始化元素
    private void initElementsFromCollection(Collection<? extends E> c) {
        Object[] a = c.toArray();
        // If c.toArray incorrectly doesn't return Object[], copy it.
		//copy集合c到数组a中
        if (a.getClass() != Object[].class)
            a = Arrays.copyOf(a, a.length, Object[].class);
        int len = a.length;
        if (len == 1 || this.comparator != null)
            for (Object e : a)
                if (e == null)//不允许为null
                    throw new NullPointerException();
        this.queue = a;//copy的元素
        this.size = a.length;//数组的大小
    }
这个方法是私有的,下面来看一个调用它的方法initFromCollection
initFromCollection
1
2
3
4
5
6
7
8
9
10
    /**
     * Initializes queue array with elements from the given Collection.
     *
     * @param c the collection
     */
    private void initFromCollection(Collection<? extends E> c) {
        initElementsFromCollection(c);
		//初始化完成之后,要重新建堆
        heapify();
    }
继续看一下heapify方法,
heapify
1
2
3
4
5
6
7
8
9
10
11
12
13
    /**
     * Establishes the heap invariant (described above) in the entire tree,
     * assuming nothing about the order of the elements prior to the call.
     */
    @SuppressWarnings("unchecked")
    private void heapify() {
		//从插入元素的最后一个节点的父节点位置开始调整,这里可能不太好理解的是i和size之间的关系,
		//正常情况下父与子的关系left(i)=2i+1,right(i)=2i+2;(这里的i是数组下标),这里的size是数组的
		//长度,这里从i开始调整有个好处,就是下面的每次调整都会让父节点成为最小的,所以到后面的时候不需要
		//每次都循环到叶子节点,大大减少了循环的次数,如果从0开始,就不会有这样的好处了
        for (int i = (size >>> 1) - 1; i >= 0; i--)
            siftDown(i, (E) queue[i]);
    }
注释都在代码中,不用再过多介绍,下面看一下另一个方法,grow(int minCapacity)
grow
1
2
3
4
5
6
7
8
9
10
11
12
13
14
15
16
17
18
    /**
     * Increases the capacity of the array.
     *
     * @param minCapacity the desired minimum capacity
     */
	 //增加空间
    private void grow(int minCapacity) {
        int oldCapacity = queue.length;
        // Double size if small; else grow by 50%
		//如果原来空间小于64,则增加2,否则扩大一倍
        int newCapacity = oldCapacity + ((oldCapacity < 64) ?
                                         (oldCapacity + 2) :
                                         (oldCapacity >> 1));
        // overflow-conscious code
        if (newCapacity - MAX_ARRAY_SIZE > 0)// 如果太大,则要重新调整
            newCapacity = hugeCapacity(minCapacity);
        queue = Arrays.copyOf(queue, newCapacity);
    }
grow是根据传进来的最小空间来初始化数组大小,其中hugeCapacity表示如果初始化空间太大,则需要重新调整size的大小。继续看下面的方法,add,其实他调用的是offer方法,下面看一下offer方法
offer
1
2
3
4
5
6
7
8
9
10
11
12
13
14
15
16
17
18
19
20
21
22
23
24
25
26
    /**
     * Inserts the specified element into this priority queue.
     *
     * @return {@code true} (as specified by {@link Queue#offer})
     * @throws ClassCastException if the specified element cannot be
     *         compared with elements currently in this priority queue
     *         according to the priority queue's ordering
     * @throws NullPointerException if the specified element is null
     */
    public boolean offer(E e) {//插入元素
        if (e == null)
            throw new NullPointerException();
        modCount++;
        int i = size;
        if (i >= queue.length)//如果空间太小
            grow(i + 1);//增加空间
        size = i + 1;//size加1
        if (i == 0)
            queue[0] = e;//如果原来没有元素,则直接添加
        else
		//添加,向上调整,添加的虽然是在数组中,但是可以把它想象成为一颗二叉树,
		//添加的时候是添加到数组的最后,相当于二叉树的叶子节点,因为是需要调整的,所以需要往上调整,
		//这个待会可以看一下下面的siftUp方法
            siftUp(i, e);
        return true;
    }
不多说,直接看siftUp方法
siftUp
1
2
3
4
5
6
7
8
9
10
11
12
13
14
15
16
17
18
    /**
     * Inserts item x at position k, maintaining heap invariant by
     * promoting x up the tree until it is greater than or equal to
     * its parent, or is the root.
     *
     * To simplify and speed up coercions and comparisons. the
     * Comparable and Comparator versions are separated into different
     * methods that are otherwise identical. (Similarly for siftDown.)
     *
     * @param k the position to fill
     * @param x the item to insert
     */
    private void siftUp(int k, E x) {//根据是否有比较器,旋转哪种调整方式
        if (comparator != null)
            siftUpUsingComparator(k, x);
        else
            siftUpComparable(k, x);
    }
没什么悬念,一个是有比较器的,一个是没有的,两个方法差不多,下面随便挑一个看一下siftUpUsingComparator方法,
siftUpUsingComparator
1
2
3
4
5
6
7
8
9
10
11
12
13
14
15
    @SuppressWarnings("unchecked")
    private void siftUpUsingComparator(int k, E x) {
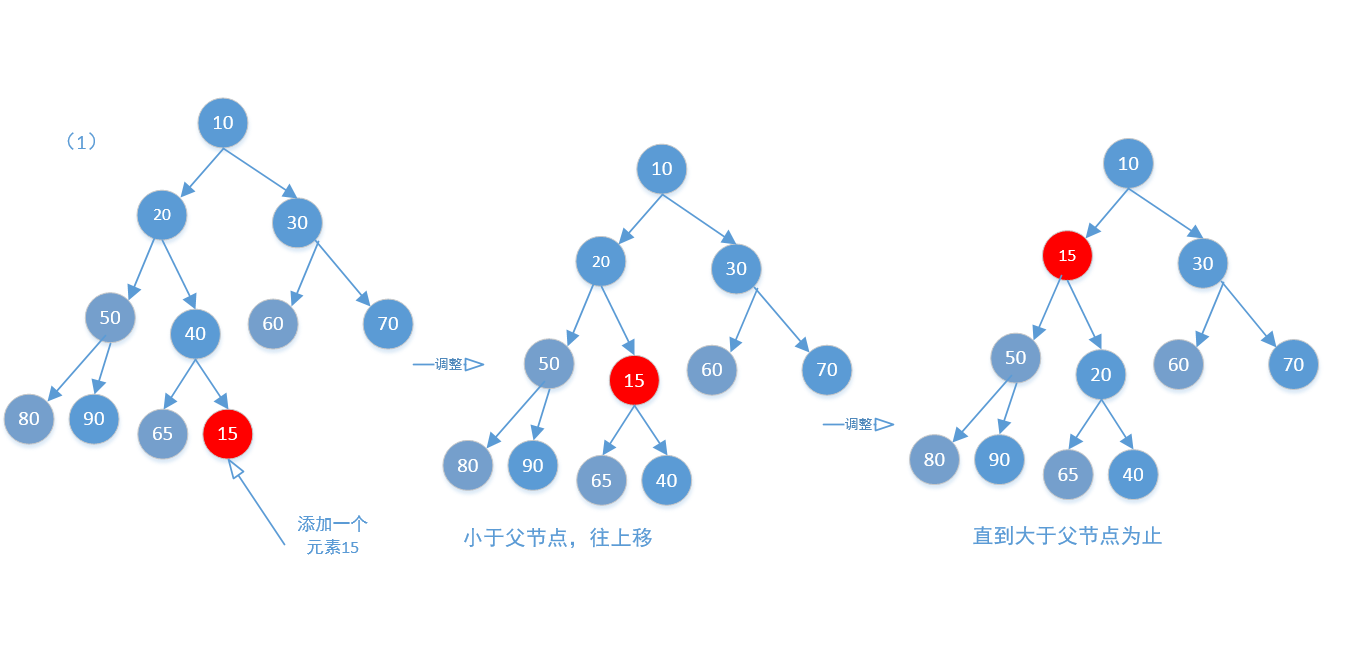
	//(1)往上调整,注意这里的x不一定是下标为k的元素,如果不明白,可以看一下下面的removeAt方法接知道。
        while (k > 0) {
            int parent = (k - 1) >>> 1;//k位置的父节点的下标
            Object e = queue[parent];// 父元素
			//如果当前的比父的大就不需要调整了,直接退出循环,因为父节点是小于子节点的
            if (comparator.compare(x, (E) e) >= 0)
                break;
				//父子交换
            queue[k] = e;
            k = parent;
        }
        queue[k] = x;// 把x放入高指定位置
    }
如果上面的注释还看不明白,待会下面通过一张图来说明,然后再看一个向下调整的siftDownUsingComparator
siftDownUsingComparator
1
2
3
4
5
6
7
8
9
10
11
12
13
14
15
16
17
18
19
20
21
22
    @SuppressWarnings("unchecked")
    private void siftDownUsingComparator(int k, E x) {
        int half = size >>> 1;
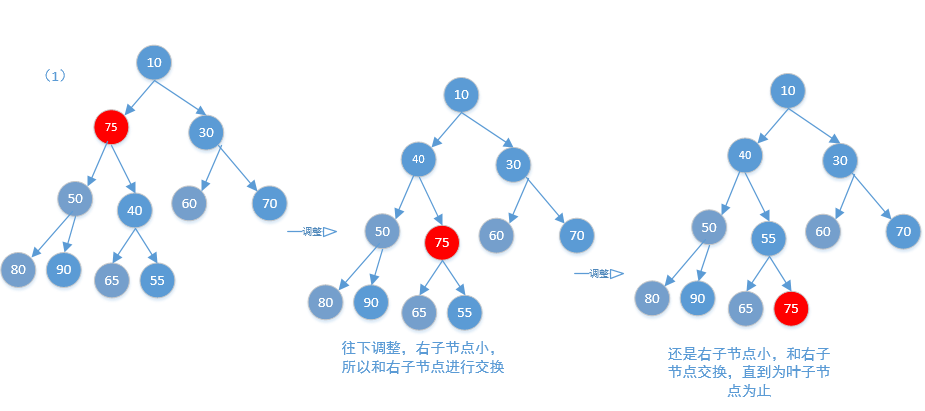
		//(2)这里为什么没有等于,因为size不是下标,是数组的长度,half所在的元素其实就是叶子节点,
		//只有k所在元素有子节点的时候才会调整,如果没有子节点就没法往下调整,所以如果等于没有意义,
        while (k < half) {
            int child = (k << 1) + 1;//默认是左子节点
            Object c = queue[child];//默认是左子节点
            int right = child + 1;//右子节点
			//比较左右两个节点,把小的保存到c中
            if (right < size &&
                comparator.compare((E) c, (E) queue[right]) > 0)
                c = queue[child = right];
				//如果x比连个子节点都小,就没有必要往下调整了,直接返回
            if (comparator.compare(x, (E) c) <= 0)
                break;
				//把最小的存储到k,然后循环
            queue[k] = c;
            k = child;
        }
        queue[k] = x;//把x插入到查找的k位置。
    }
这两个方法才是这个类的主要的方法,没什么难度,下面画个图,更容易理解上面的(1)和(2)分别对应下面的图(1)和(2)。

添加的时候是从最后一个添加的,也就是叶子节点,但往上调整并不是每次都是从最后的叶子节点开始的,还有移除等方法都有可能调用这个方法,其实原理都一样,把当前需要调整的节点和父节点对比,如果小于父节点就交换,如果大于停止循环,不要交换,OK,下面再来看一下往下调整的方法图

OK,下面再看另一个方法poll(),表示获取二叉树的根元素
poll
1
2
3
4
5
6
7
8
9
10
11
12
13
14
	//获取第一个元素,也就是二叉树的根
    @SuppressWarnings("unchecked")
    public E poll() {
        if (size == 0)
            return null;
        int s = --size;// size减1
        modCount++;
        E result = (E) queue[0];//移除的元素,
        E x = (E) queue[s];//最右一个元素
        queue[s] = null;//让最后一个为空
        if (s != 0)
            siftDown(0, x);//往下调整
        return result;
    }
接着看,下一个removeAt
removeAt
1
2
3
4
5
6
7
8
9
10
11
12
13
14
15
16
17
18
19
20
21
22
23
24
25
26
27
28
29
30
31
32
33
34
    /**
     * Removes the ith element from queue.
     *
     * Normally this method leaves the elements at up to i-1,
     * inclusive, untouched.  Under these circumstances, it returns
     * null.  Occasionally, in order to maintain the heap invariant,
     * it must swap a later element of the list with one earlier than
     * i.  Under these circumstances, this method returns the element
     * that was previously at the end of the list and is now at some
     * position before i. This fact is used by iterator.remove so as to
     * avoid missing traversing elements.
     */
	 // 移除下标为i的元素
    @SuppressWarnings("unchecked")
    E removeAt(int i) {
        // assert i >= 0 && i < size;
        modCount++;
        int s = --size;
        if (s == i) // removed last element
            queue[i] = null;//如果是最后一个直接删除,不需要在调整,因为最后一个在二叉树中是叶子节点
        else {
            E moved = (E) queue[s];//记录最后一个元素
            queue[s] = null;//然后把最后一个元素的位置置null
			//从i位置开始往下调整,相当于把最后的moved放到i位置上然后调整,
            siftDown(i, moved);
            if (queue[i] == moved) {
			//如果往下调整的时候下面的两个子节点都比他大,是调整不了的,所以需要在往上调整,
                siftUp(i, moved);
                if (queue[i] != moved)
                    return moved;
            }
        }
        return null;
    }
OK,到目前为止,基本上分析完毕。